Shop Counter: how to use it
A plain guide for the person running the shop. Each part says what to tap, with a screenshot of the real app. The screens show a made-up shop, Mill Street Stores.
1. What Shop Counter is
Shop Counter is a till, a stock book and a small shop's office, all on your phone. You ring up sales, keep track of what is on the shelves, see who owes you money, count the drawer at the end of the day, and see how the shop is doing. Everything is kept on your phone. There is no account to make, and it works without the internet.
If you run a café or restaurant you can switch on tables and orders. If you lend things out you can switch on rentals. If you do neither, those screens stay out of your way.
Good to know. Everything in this guide works on the free version, which shows an advert now and then. The yearly ad-free subscription removes the adverts, opens the browser view (Desktop access) in full, and adds exports: sharing reports and lists as CSV, PDF or XML files. Receipts, invoices and your backup are always free. See section 20.
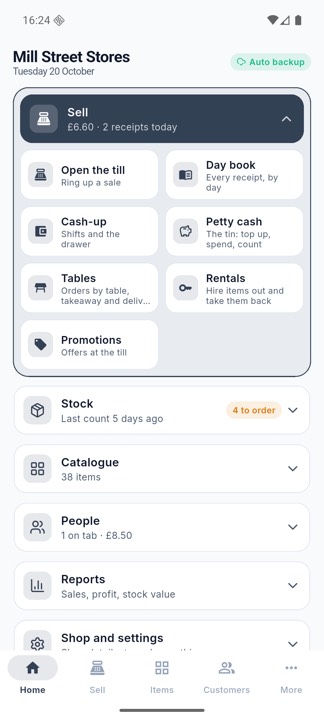
2. Finding your way around
Along the bottom are five tabs:
- Home: groups of everything the app does, with a one-line summary on each.
- Sell: the till, for quick selling.
- Items: everything you sell, with how many you have.
- Customers: people and businesses you sell to, and what they owe.
- More: settings, printers, backup and switches for extra features.
On Home, tap a group's title to open it and show its tiles. Tap it again to close it. The groups are Sell, Stock, Catalogue, People, Reports, Shop and settings, and Status. Under Status you can see at a glance if anything needs attention.
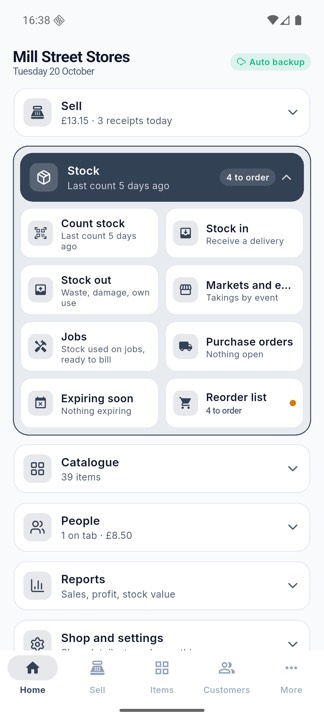
Good to know. You can choose which tab the app opens on and which tabs sit in the bottom bar: More, then Bottom bar and Home screen.
3. Setting up your shop
Open Home, then Shop and settings. These are the first things to set:
- Shop details: your shop name, address and phone, which print on receipts, and the footer line such as "Thank you".
- Tax rates: what your tax is called (VAT, GST, sales tax), the rates you charge, and whether your prices already include tax. Get this right before you sell, because it decides how every receipt is worked out.
- Locations: the places you keep stock, such as the shop floor and the stock room. Stock is counted in each place separately.
- Alerts: reminders when an item runs low.
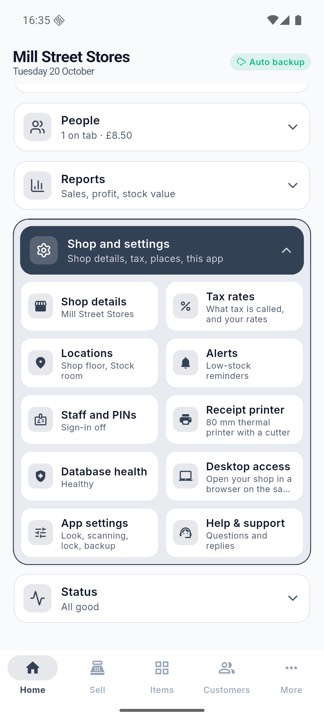
Good to know. Choose the currency and whether prices include tax at the start. Changing them later is possible, but old receipts keep the way they were worked out.
4. Adding the things you sell
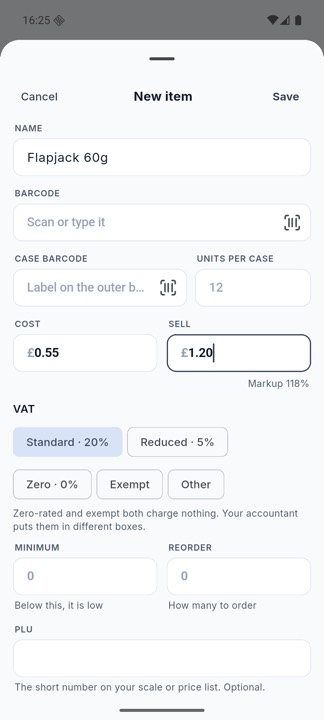
Open the Items tab to see everything you sell, how many you have, and the price. Tap the round plus button to add a new item.
- Type the name, for example "Flapjack 60g".
- Scan the barcode with the camera button, or type it. If you scan a barcode the app does not know and you are online, it may suggest a name, which you check before saving.
- Enter what it costs you and what you sell it for. The app shows your markup so you can see the profit. Only you see the cost.
- Choose the tax rate that applies: standard, reduced, zero, exempt, or another.
- Set a minimum (below this, the item shows as low) and a reorder amount (how many to order).
- Tap Save.
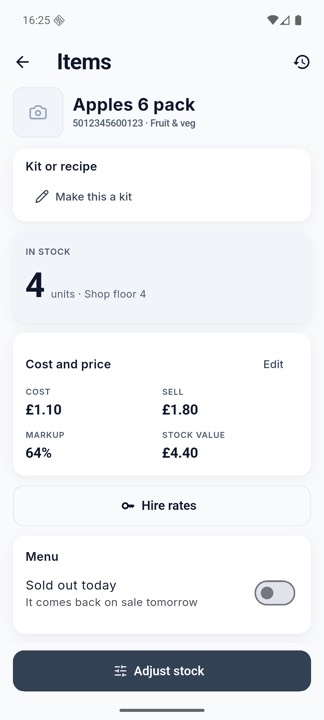
Tap any item in the list to see its page: how many you have and where, cost, price, markup, stock value, and its history. From there you can adjust the stock, edit the price, add a photo, or make it a kit or recipe.
Printing barcode stickers
Open Items, choose Labels, tick the items and how many of each, then tap Print. Stickers come in many sizes, so the layout is yours to set: tap Layout on the Labels sheet (or More, then Barcode label layout, or Settings in the browser). Choose the pack you bought from the list of common sheet and roll sizes, or type the measurements printed on the packet: the page, the size of one label, how many across and down, the margins and the gaps. You can choose the barcode type (Code 128, EAN-13 or QR code), its height, and whether the code, the item name and the price are printed. Print a test sheet on plain paper and hold it against a sticker sheet to the light; if it is a little off, use Move everything right or down to correct it.
Handy extras
- Case barcode and units per case: scan a case and the app adds a whole case.
- PLU: the short number from a scale or price list.
- Photos: tap the camera tile on the item to add a picture, which shows in the till and the order menu.
- Favourites and colour tags: mark the things you sell most so they are quick to find.
- Kits and recipes: sell a coffee that uses beans, milk and a cup, and the app takes each of them off the shelf.
- Sizes and colours: make one product in several variants at once.
- Importing: bring a list of items in from a spreadsheet using Desktop access (section 16).
5. Receiving stock
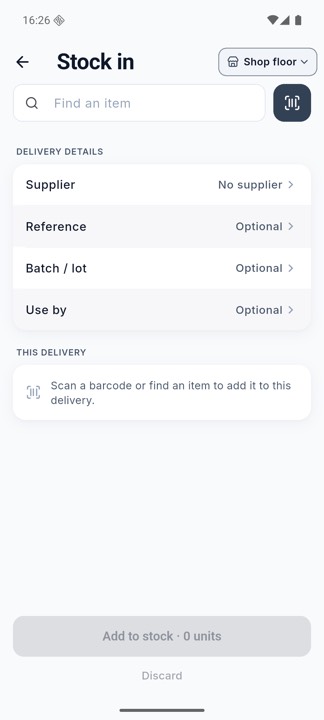
When a delivery arrives, open Home, then Stock, then Stock in.
- Choose where the stock is going at the top, for example Shop floor.
- Pick the supplier, add your delivery note number under Reference if you like, and a Batch or lot and a Use by date for things that expire.
- Scan each item, or find it by name, and set how many arrived and what each cost.
- Tap Add to stock. The numbers go up straight away.
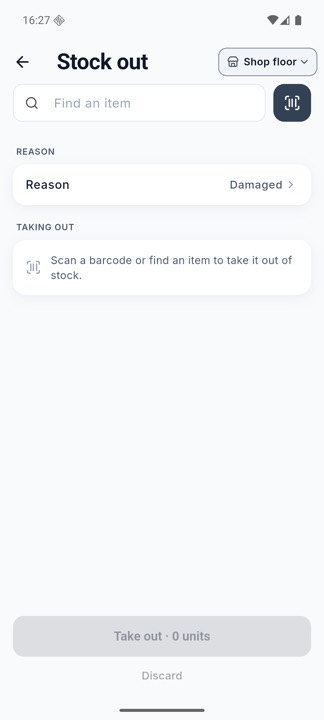
To record something that has gone without being sold, such as waste, damage, your own use or samples, use Stock out:
6. Selling
The Sell tab is your till. Everything on it is built for speed.
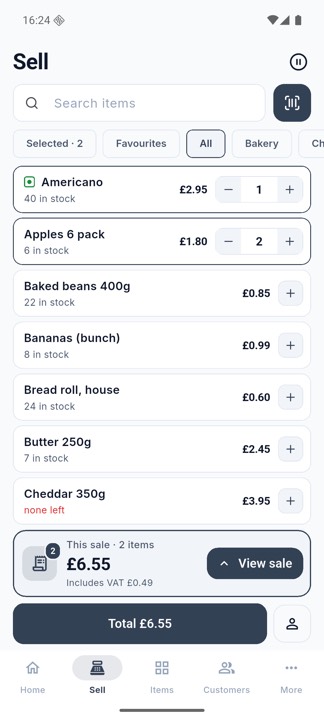
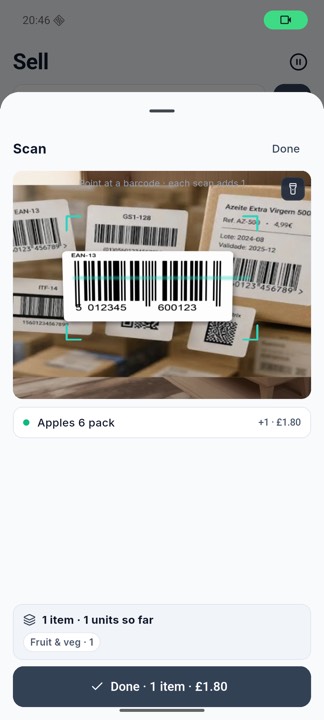
- Find what the customer is buying: scan the barcode, type part of the name, or tap an item in the list. Tap the plus to add one more, or the minus to take one off.
- Things you have added jump to the top of the list, so you can always see what is in the sale. The Selected chip shows only those.
- The bar at the bottom shows the running total and how much of it is tax. Tap View sale to check each line, change a price, or give a discount.
- Tap the big Total button to take payment.
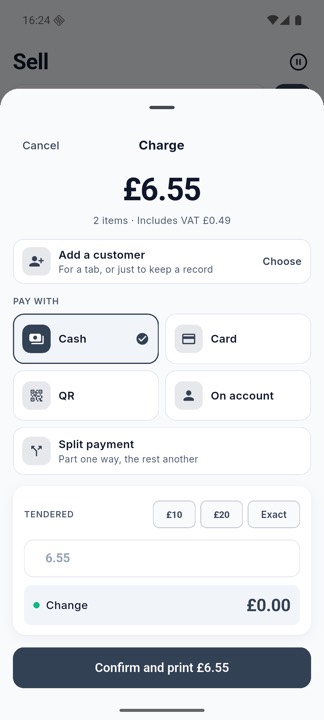
On the payment screen choose how the customer is paying:
- Cash: type what they gave you, or tap £10, £20 or Exact. The app shows the change to give back.
- Card, QR and Bank transfer: just record it. Shop Counter does not take the card payment itself; it records that you were paid.
- On account: add the sale to the customer's tab, to be paid later (see section 8).
- Split payment: part one way and the rest another, for example £5 cash and the rest by card.
- Add a customer: attach the sale to someone, for their tab or just to keep a record.
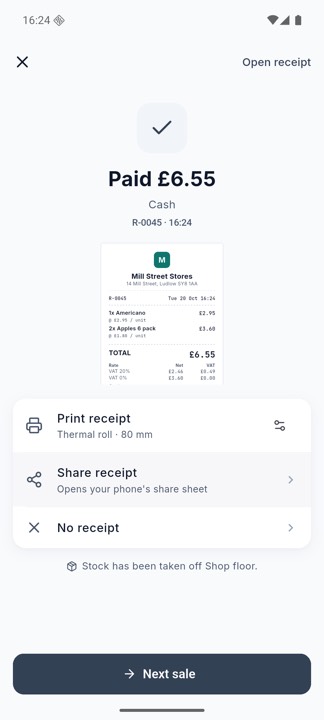
After you confirm, the receipt appears. You can print it on a receipt printer, share it by WhatsApp or email, or give no receipt. Then tap Next sale.
Other things the till can do
- Hold a sale: tap the pause button at the top of Sell to put a sale aside while you serve someone else. Pick it up again from the same button.
- Weighed items: for things sold by weight, enter the weight. A scale that prints price or weight barcodes can be read by the app (More, then Scale and price labels).
- Refunds: open the receipt from the Day book and refund it. The stock goes back on the shelf and the money goes back out of the day's takings.
- Price changes at the till: change a price for one sale and give a reason, such as "Damaged box".
- Discounts: a percentage or an amount, on one line or the whole sale, if the signed-in person is allowed to give them.
7. Promotions
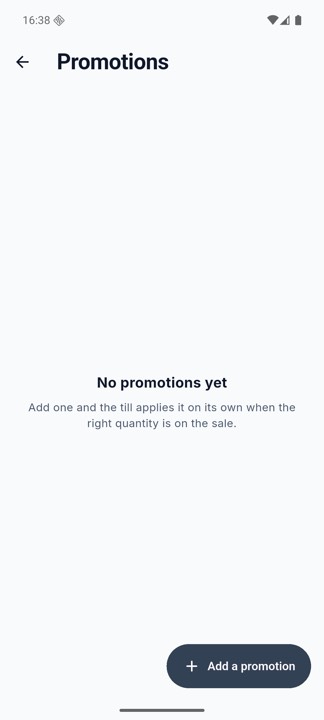
Open Home, then Sell, then Promotions. Add an offer such as "3 for 2" or "2 for £1.50" on an item, and the till applies it by itself when the right number is in the sale. You do not have to remember it or work it out.
8. Customers, tabs and loyalty
The Customers tab lists the people and businesses you sell to. Add one with the plus button: a name, phone, email, address, and for businesses a tax number and how many days they have to pay.
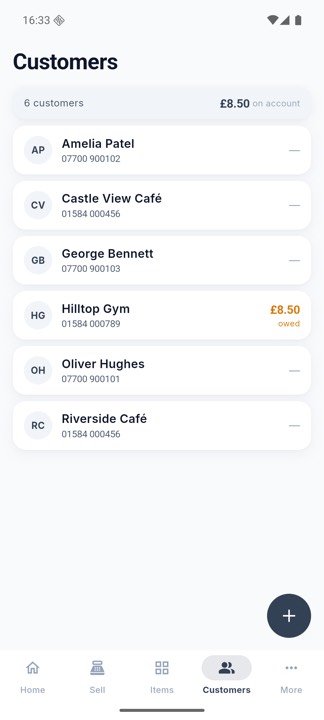
When you take a sale On account, the amount goes onto that customer's tab. Open the customer to see the tab, what is overdue, and to record a payment when they pay. Tap Send a reminder and your messages app opens with the amount already filled in.
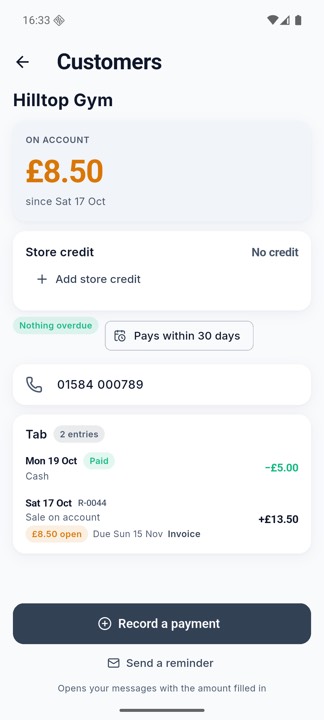
- Invoices: a sale on account can be turned into an invoice for a business customer, and you can print or share it.
- Store credit: give a customer credit for a return or as goodwill, and they can spend it at the till.
- Loyalty points: switch on in More, then Loyalty points. A customer attached to a sale earns points on what they pay, and points turn into store credit. A refund takes the points back.
9. The end of the day
Day book
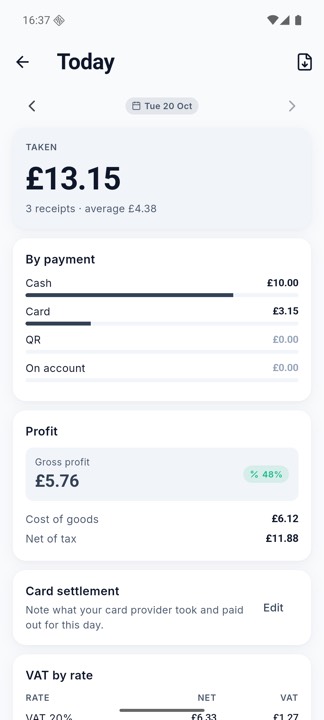
Open Home, then Sell, then Day book. It shows what you took today: the total, how it was paid (cash, card, QR, on account), your profit, the tax broken down by rate, and every receipt. Use the arrows to look at other days, and the button at the top right to save the day as a PDF or spreadsheet.
Cash-up
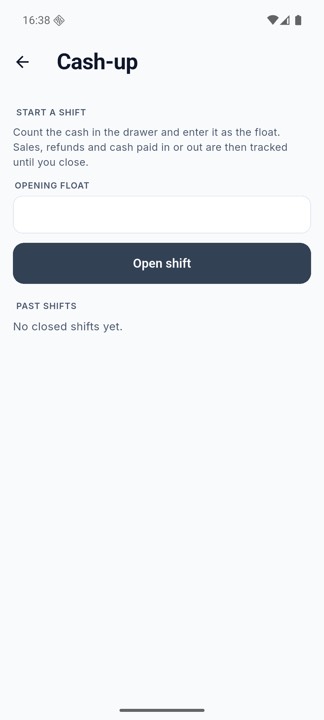
Open Cash-up when you start the day, count the cash in the drawer, and enter it as the opening float. All day the app keeps track of cash sales, refunds, and any cash you put in or take out. At the end, count the drawer again and enter the amount. The app shows whether you are over or short.
Hire deposits taken in cash and cash tips are also put in the drawer for you, so the count matches.
Petty cash
The tin for small spending, kept apart from the till. Top it up, record what you spend and what for, and count it now and then. The app shows what should be in it.
10. Counting your stock
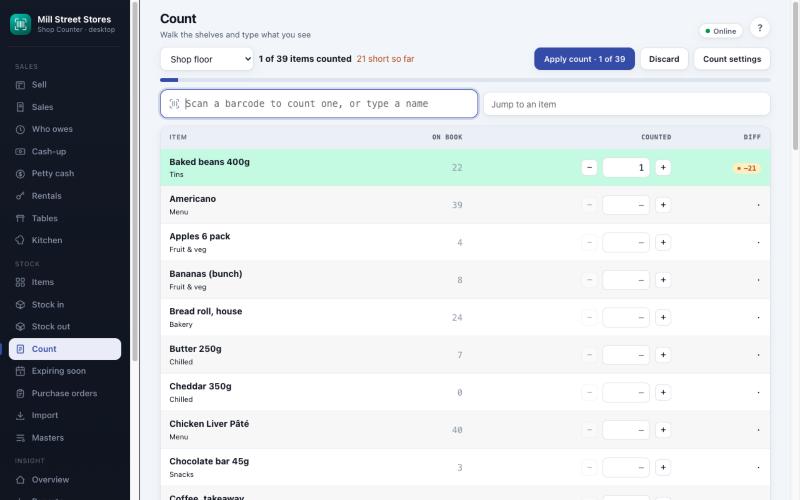
Open Home, then Stock, then Count stock. It lists every item with the number the app expects (On book). Count what is really on the shelf and enter it with the plus and minus buttons, or tap the number to type it. Scan an item to jump straight to it.
- Counted items move to the top, in the order you counted them, so the rest of the shelf is still waiting below.
- Review count: when you have finished, tap it to see everything that differs, then apply it. The app corrects your stock and keeps a record of the difference.
- Blind count: in the Count settings (the sliders button) you can hide the expected numbers so staff count honestly.
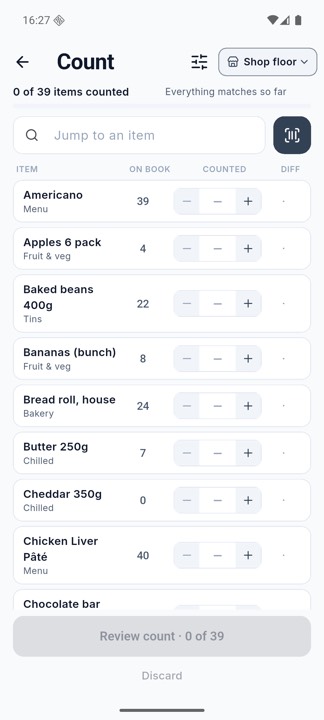
You do not have to count everything at once. Count one shelf and apply it, or count a few items each week.
11. Running low, ordering and what is about to expire
- Reorder list: everything below its minimum, grouped by supplier with how many to order and the likely cost. Share it as a message or a PDF, or turn a supplier's list into a purchase order.
- Purchase orders: make an order for a supplier, send it, and when the delivery comes, receive it against the order. The app tracks what you still owe the supplier.
- Expiring soon: items with a use-by date that is near or past, so you can sell them first or take them off.
- Markets and events: take stock to a market or an event as its own place, sell from it, and see how much the event took.
- Jobs: record stock used on a job for a customer, and bill it afterwards.
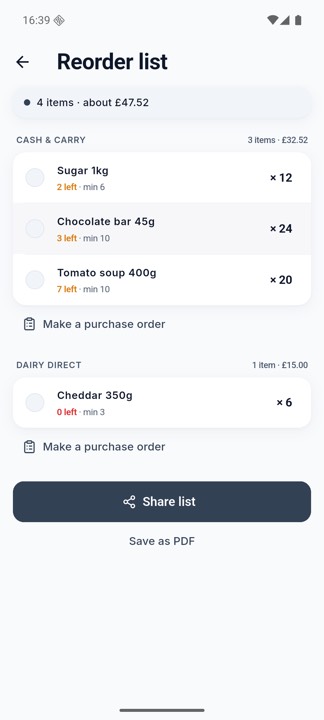
12. Reports
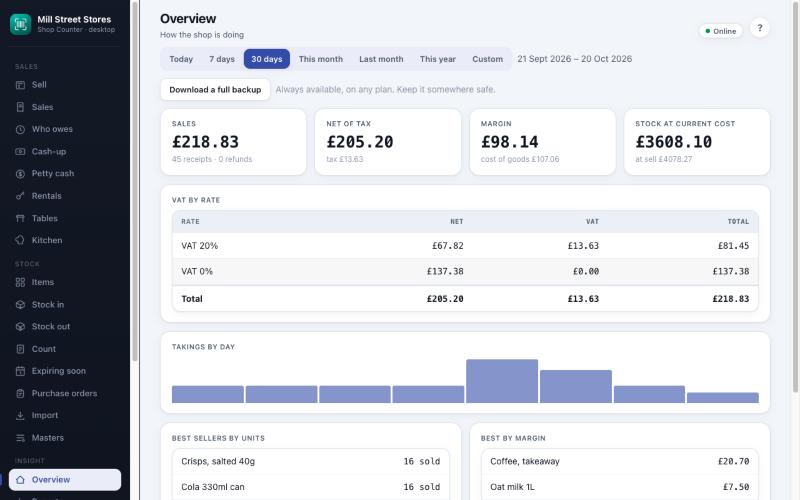
Open Home, then Reports. The Overview shows sales, cost, profit and tax for any period you choose (today, 7 or 30 days, this month, this year, or your own dates), with a chart by day, how many receipts, and your best sellers.
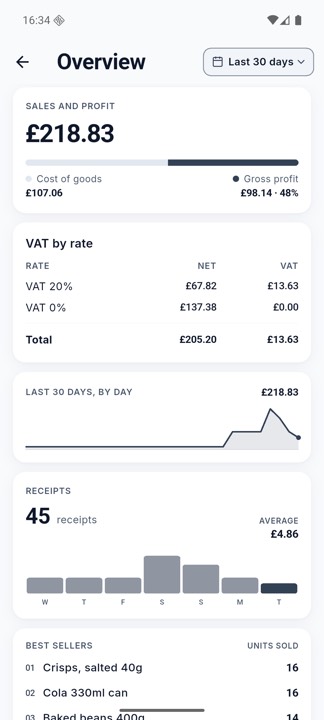
There are more reports for the questions a shopkeeper asks:
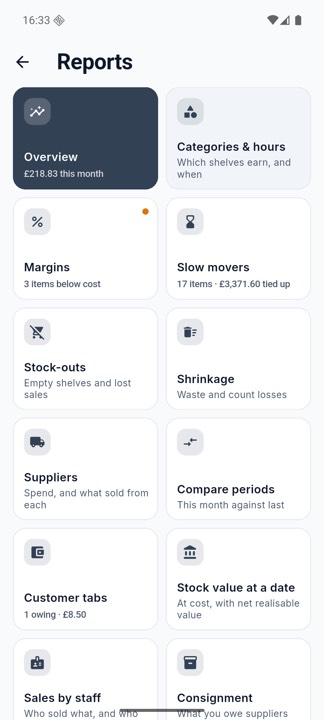
- Categories and hours: which shelves earn, and when the shop is busiest.
- Margins: what you earn on each item, and which are sold below cost.
- Slow movers: stock that is not selling and how much money is tied up in it.
- Stock-outs and Shrinkage: empty shelves and lost sales, and waste and count losses.
- Suppliers: what you spend and what sold from each.
- Compare periods: this month against last month or last year.
- Stock value at a date: what your stock was worth on any day, in the past.
- Sales by staff, Consignment and Rentals, where you use those features.
- The Audit trail lists every change, with who made it and when.
Good to know. The stock figure shown on the Items list uses each item's latest cost. The Stock value at a date report uses an average of what you paid, so the two can differ a little. Both are right for their purpose.
13. Tables and orders (cafés and restaurants)
Switch this on in More, under Shop features, by turning on Restaurant. A Tables tile then appears under Sell on Home.
Setting up tables
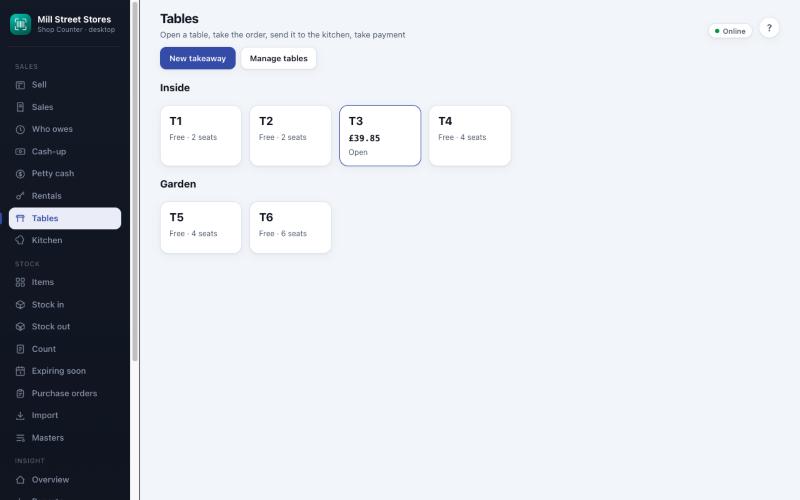
On the Tables screen tap the sliders button at the top to add your tables: a name, how many seats, and an area such as Inside or Garden. Mark dishes on their item page with a station (kitchen or bar), a course (starter, main, side, dessert, drink), a diet mark (vegetarian, vegan) and a short description, and tick Sold out today when something runs out.
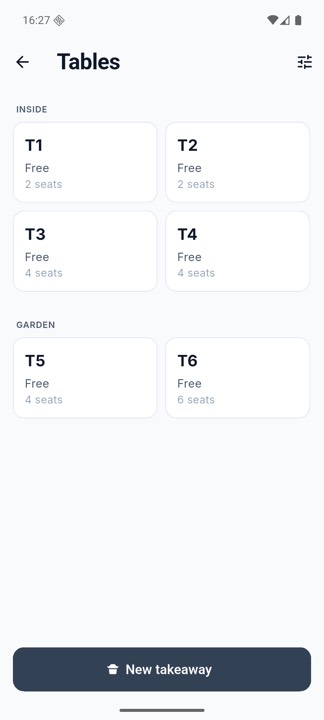
Taking an order
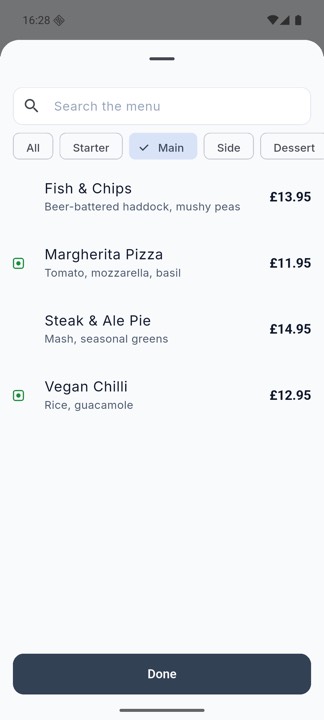
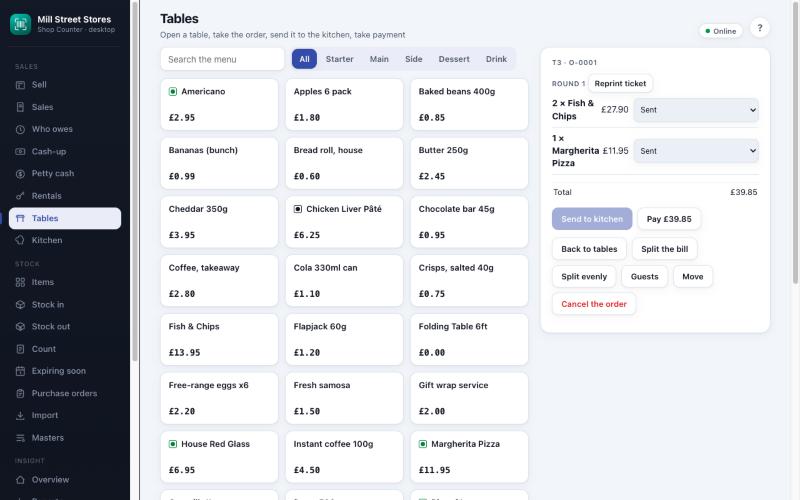
- Tap a table. Tap Add items.
- The menu sheet lists your dishes. Filter by course, or search. Tap a dish to add it; tap again for two. A sold-out dish asks before it is added.
- Close the sheet, then tap Send to kitchen. The dishes go on a ticket, in a numbered round, and print on the kitchen or bar printer if you have set them up.
- Add more rounds as the table orders. Each is sent separately.
- A dish you have not sent yet can be changed or removed. Once it is sent, removing it needs a reason.
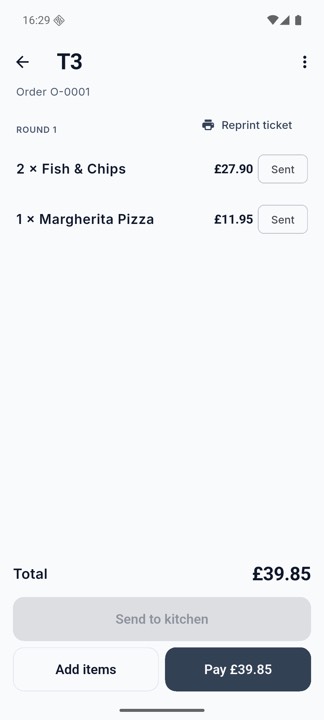
The menu at the top right of an order lets you change the number of guests, move the order to another table (or merge two), or cancel it. Takeaways and deliveries use the New takeaway button on the Tables screen.
Paying, splitting and tips
Tap Pay and choose how it is paid. Above the payment choices is a Tip row: no tip, 5%, 10%, 15%, or another amount. A tip is kept apart from the sale: it is not in the total, the tax or your takings. A cash tip is put in the drawer so the count matches; a card tip is only recorded.
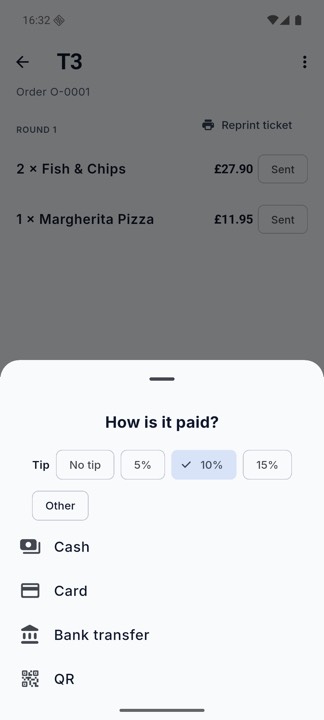
To split a bill there are two ways, both in the order's menu:
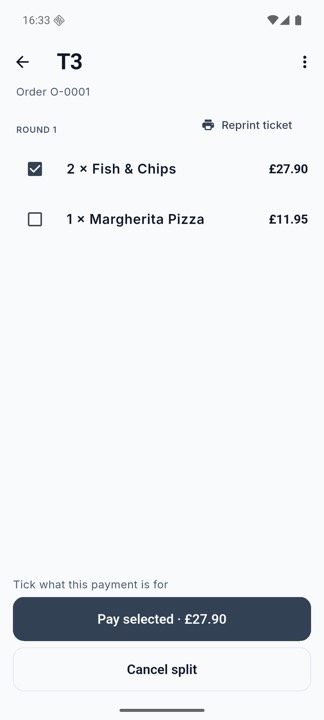
- Split the bill: tick the dishes one person is paying for and tap Pay selected. That is a receipt of its own, and the table stays open for the rest.
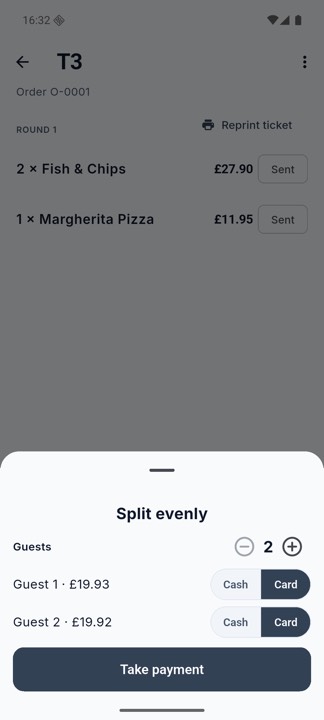
- Split evenly: choose how many guests, and who pays by cash and who by card. The odd pennies go to the first guests.
The kitchen
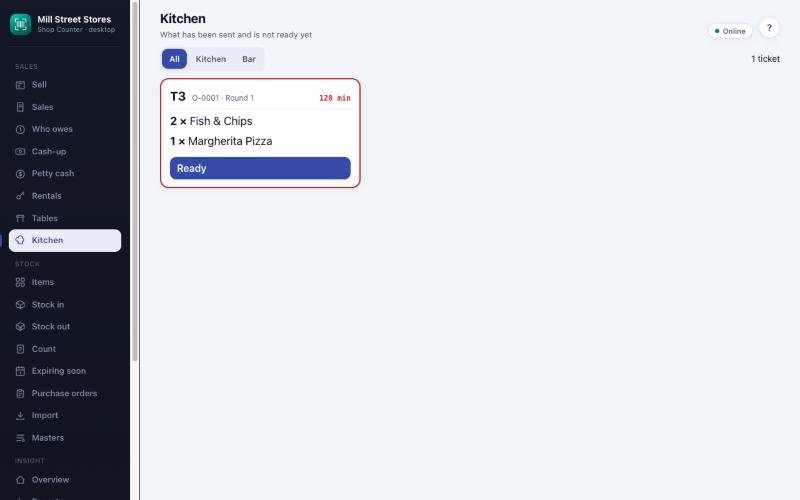
The kitchen can see new orders on a screen of their own. Use a second phone or tablet and either set it to Kitchen screen (More, then This device), or open Desktop access in its browser (section 16) and sign in as a kitchen person. The kitchen marks each dish ready, and the waiter sees it. A kitchen printer prints a ticket for each round; set the Kitchen printer and Bar printer in More.
14. Hiring things out (rentals)
Switch on Rentals in More, under Shop features. Use it if you lend out ladders, tools, party equipment or anything else for a fee.
- Open an item and tap Hire rates. Set the price per hour, day or week, the deposit, and a late fee per day. The item is then available for hire.
- Open Home, then Sell, then Rentals, and tap New hire.
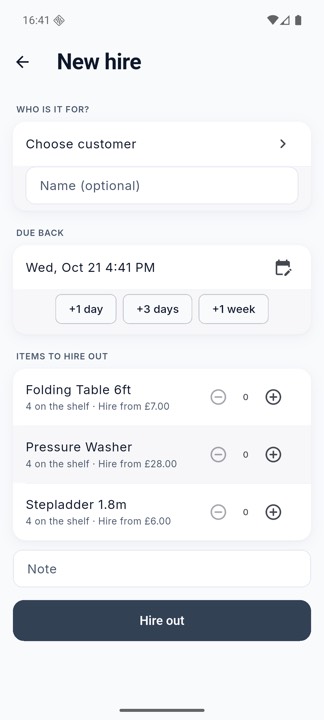
- Choose who it is for (a customer, or just type a name), set when it is due back, and pick the items and how many. Tap Hire out.
- If a deposit applies, say whether it was taken in cash or by card. A cash deposit goes into the drawer and comes back out when the hire ends.
- When the items come back, open the hire, enter how many came back (and any lost, or a damage charge), and take payment. The app works out the cheapest fair charge for the time out, adds a late fee if it was late, and puts it on a normal receipt.
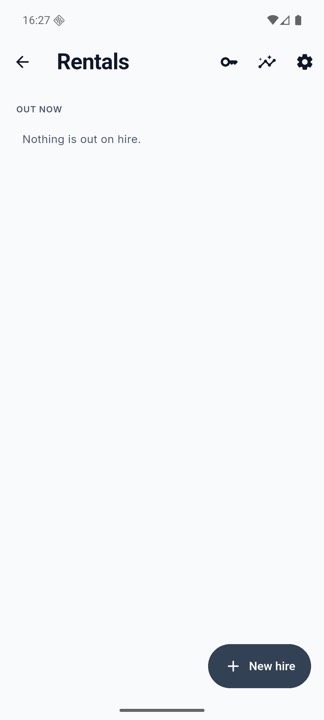
A report of hire income by item, with late fees and damage charges, is in the Rentals screen and in Reports. If a hire was made by mistake and nothing has been returned, cancel it and everything goes back on the shelf.
15. Staff, PINs and what each person can do
Open Home, then Shop and settings, then Staff and PINs. Add the people who use the app, give each a PIN, and give each a role: Manager, Cashier, Stock clerk, Waiter or Kitchen. The owner has every permission. A role decides what the person can do: for instance a cashier can sell and give discounts but not refund, a waiter takes orders and a kitchen person only sees the kitchen.
- Switch Sign-in on and the app asks who is serving. The sale shows who made it, and the audit trail records who changed what.
- You can change what each role may do.
- If you forget the owner PIN, the phone's own unlock (fingerprint, face or screen lock) lets you reset it, or you can make a one-time recovery code beforehand.
Good to know. The owner PIN is also needed to switch a phone out of Kitchen screen mode, so a customer cannot change it.
16. Desktop access: your shop in a browser
Desktop access lets you use the shop from a computer or another phone, on the same Wi-Fi, in an ordinary web browser. It is useful for entering lots of items, bigger reports, a second till, or a kitchen screen. Nothing goes over the internet; the phone serves the page itself.
Connecting
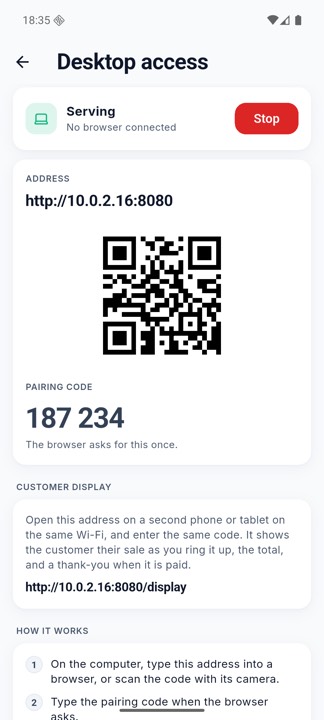
- On the phone, open Home, then Shop and settings, then Desktop access, and tap Start.
- The phone shows an address, a QR code and a six-digit pairing code. On the computer, type the address into a browser, or scan the code with its camera.
- Type the pairing code when the browser asks. You only do this once for each browser.
- Use the shop. Tap Stop on the phone when you are done.
Once paired, the browser opens your shop. The menu down the left lists everything: Sell, Sales, Who owes, Cash-up, Petty cash, Rentals, Tables and Kitchen at the top, then Items, Stock in and out, Count, Expiring soon, Purchase orders, Import and Masters, and then the reports. It shows the same shop as the phone, live: a sale made on either appears on both.
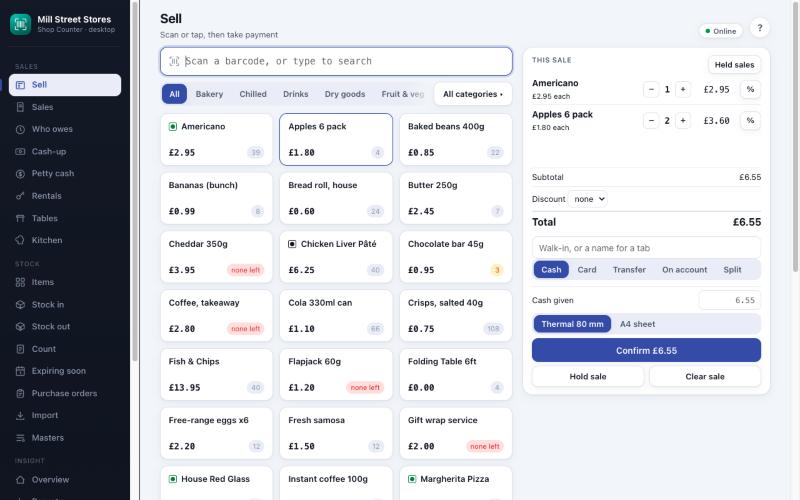
Selling from the browser
A big till for a computer with a barcode scanner: scan a barcode (the scanner types it for you) or type part of a name. Items go into the sale on the right, where you can change quantities, give a discount, name a customer for their tab, choose how it is paid, and print the receipt on the receipt printer.
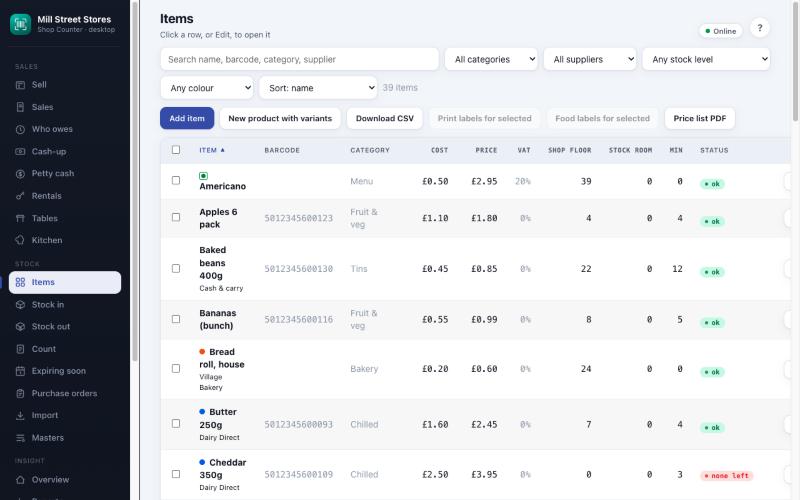
Items and counting stock with a keyboard
Adding or editing a lot of items is quicker with a keyboard. The Items page is a sortable, searchable table with cost, price, tax, stock in each place and a status, and you can print shelf labels and a price list. Import brings a whole list in from a spreadsheet. Count works as on the phone, and counted items move to the top.
Tables, waiters and the kitchen
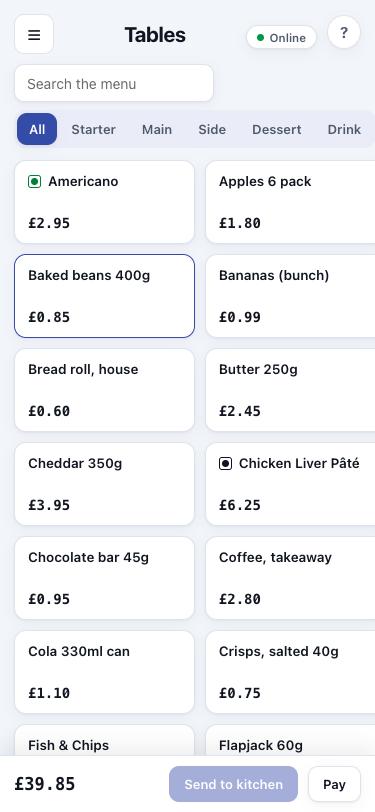
A waiter can take orders from a second phone or a tablet in its browser, with no app to install. Open the address, pair, sign in with a waiter PIN, tap a table and add dishes. The screen fits a phone, with Send to kitchen and Pay along the bottom. The same order appears on the main phone.
The kitchen can leave a screen open on a tablet or old phone. Each sent order is a ticket with the table, the round, the dishes and how long it has waited; the kitchen taps Ready and the waiter sees it. Filter to Kitchen or Bar if you have both.
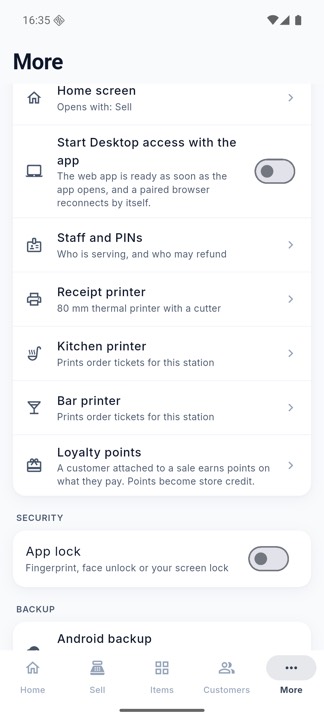
- The phone has to stay awake and on the same Wi-Fi, and Desktop access pauses if the phone locks or you leave the app. Switch on Start Desktop access with the app (More) to have it ready when the app opens, and the browser reconnects by itself.
- On the free version, the browser shows the Overview, and the rest opens for 20 minutes after you watch a short advert on the phone. With the ad-free subscription everything is open all the time. Downloading a report or list as a file from the browser is part of the subscription too.
- The owner can change the shop's settings from the browser too: open Settings in the Admin group for the shop details and receipt lines, tables and hiring on or off, loyalty points, the receipt, kitchen and bar printers (with a test page), how Desktop access starts, and the petty cash limit. Reminders, the app lock, the look of the app, the camera and the cloud backup are set on the phone only.
- With Sign-in on, each person in the browser signs in with their own PIN and sees only what their role allows.
- A customer-facing screen is available at the address with /display on the end. Put a second phone or tablet by the till and it shows the customer their sale as you ring it up, and a thank-you when it is paid.
17. Printers and the cash drawer
Open More, then Receipt printer. Shop Counter prints to an 80 mm thermal receipt printer with a cutter, connected to your Wi-Fi. Use Find printers to look for it, or type its address, then print the test page. The same screen has settings for the width of the paper, the character set for pound or euro signs, how the receipt is cut, and opening a cash drawer connected to the printer when a cash sale is made.
For restaurants, set up the Kitchen printer and the Bar printer in the same way; each prints the tickets for its own station. If there is no printer, the phone's normal print and share options are always available.
Good to know. Printers that connect by Bluetooth or USB are not supported yet. A network printer is needed.
Printing on pre-printed receipts and invoices
If your shop has receipt or invoice paper that already carries your name, address and boxes, Shop Counter can print only the details that change. Open More, then Pre-printed stationery (or Settings in the browser). For the receipt and the invoice separately, switch on Print on pre-printed paper and choose the paper: A4, A5 upright or across, US Letter, half letter, 7 by 9 inch bill books, 7 by 4 inch challan books, or continuous dot-matrix paper (9.5 by 11 inch, 9.5 by 5.5 inch, 240 mm by 12 inch), or type your own size. Each detail has its own place in millimetres, width, text size and alignment, and can be switched off; the item rows have a first row, a row height and a number of rows; and Move everything right or down matches the whole sheet to the form. Print the test page, which has a millimetre ruler and an outline round every place, on plain paper at actual size, hold it against a printed form to the light, and adjust until everything sits in its box. Leave 5 to 10 mm at the paper's edges, where printers cannot print.
For a dot-matrix printer, the Dot matrix tab sends plain text with Epson commands, which is much quicker than a picture and works with Epson FX and LQ, TVS MSP, Star and others that understand them. These printers have a USB or parallel socket and no network or Bluetooth, and an iPhone cannot print to them directly, so text mode needs a network address: a print server on the printer, or a PC that shares it. Without that, the page goes to the phone's print dialog, or to the PC's own driver when you print from the browser. Choose the characters to the inch the form was designed for and the paper feed (1/216 inch for 9-pin printers, 1/180 inch for 24-pin) and check them with the test page.
Choosing what a receipt and an invoice show
Open More, then Receipt and invoice layout. A preview of your latest receipt or invoice changes as you go. For the receipt you can choose whether the shop address, phone number and tax number print, the price of each, the tax lines and the payment QR code, the size of the text, and add a few words under the shop details and at the very end. For the invoice you can set the title (for example Tax invoice), its colour, the paper (A4 or US Letter), the details shown, the invoice note and a line at the bottom. The same choices apply on the till printer, in the PDF receipt and in the browser.
18. Keeping your data safe
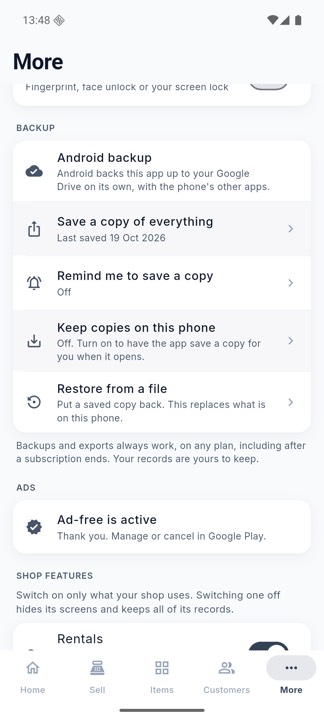
Your shop is stored on your phone, so a lost or broken phone loses it unless you have a backup. Open More and scroll to Backup:
- Save a copy of everything: makes one file and opens the share sheet so you can save it to a drive, send it to yourself or keep it on a computer. Do this regularly.
- Remind me to save a copy: a reminder every week or month.
- Keep copies on this phone: the app saves a copy for you when it opens, weekly or monthly, and keeps the newest few. Useful, but a copy only on the same phone is not enough.
- Restore from a file: put a saved copy back. This replaces what is on the phone, so the app asks you first.
- Android backup / iCloud: the phone's own backup may also include the app.
Good to know. Backups are always free, on every plan. The copy is compressed and can be large for a very busy shop, so give it a moment to finish and keep the app open while it works.
More also holds Clear some data. It lets you remove old sales or stock history to keep the app quick, and carry forward what customers and suppliers owe, loyalty points and store credit so the books still add up. A copy of everything is saved first. Audit entries older than three years are cleared automatically.
19. Settings worth knowing
- Scanning: scan automatically, with the volume button, or with a scan button.
- Appearance: light or dark, and an accent colour. Compact mode makes text and rows smaller to fit more on a small screen.
- Dim the screen while connected: saves battery while Desktop access is on.
- App lock: ask for your fingerprint, face or screen lock before the app opens.
- Shop features: turn Rentals and Restaurant on or off. Turning one off hides its screens and keeps its records.
- Database health: shows that the data is sound and runs the daily tidy-up, which keeps the app fast.
20. The free version and the ad-free subscription
Shop Counter is free to use. The free version offers a full-screen advert at most once every 20 minutes, only when you move between tabs and never when the app opens; a screen first lets you watch it, go ad-free, or choose not now. There is also an advert on the Desktop access screen. The optional yearly subscription removes the adverts, opens Desktop access in full, and includes exports. It is bought, managed and cancelled in the App Store or Google Play, and a restore button on the subscription screen brings it back after reinstalling. Your backups and all your data are the same on every plan, and stay yours.
What counts as an export
Exports are the files you share or download so you can use your figures somewhere else: the report CSVs and PDFs, the accountant pack, the items list, the day book and its GST and Tally files, the stock value, who-owes and cash-up files, the audit trail, and the same downloads in the browser. On the free version, tapping one explains the plan and offers it. The exception is the Export page in Desktop access: a plain CSV file of your items is free on every plan.
Always free. Printing and sharing receipts and invoices, purchase orders, labels, the backup and restoring it, and every screen of the app. You can always see your figures on the phone.
21. Questions and problems
- The numbers look wrong: check Tax rates (prices with or without tax) and the date range on the report. Use Count stock to correct stock that does not match the shelf.
- A browser cannot connect: make sure Desktop access is started, the phone is on the same Wi-Fi as the computer, and nothing like a VPN is in the way. On iPhone allow the local network when asked.
- The printer does not print: check it is on and on the same Wi-Fi, use Find printers, and print the test page. If the cutter does not cut or the pound sign is wrong, try another option on the printer screen.
- I lost my phone: install the app on the new phone and restore your latest copy from More, then Restore from a file.
- Anything else: open Home, then Shop and settings, then Help and support, and send us a message. It includes your app version and phone type so we can help faster.
You can also write to contact@brightscalelabs.com. Our privacy policy, terms of service and terms of use are on this site.